How to Reverse Sear Chicken
Reverse searing chicken can be done with any cut of chicken. Half of the recipes are cooked in the kitchen, and half are finished on the grill. Both start off with indirect heat, and finish with direct heat. This method produces moist, tender meat that tastes great! Read on to learn how to prepare your chicken for a perfect reverse sear. Here are some recipes and tips for cooking your chicken to perfection. You will be on your way to a delicious dinner!
Recipes for reverse sear chicken
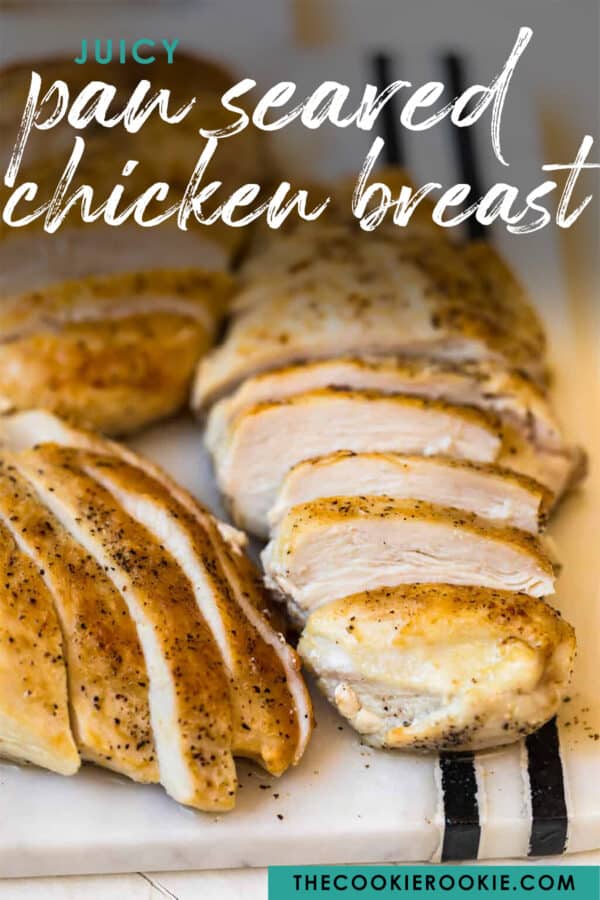
Reverse seared chicken breast is a great way to create juicy, moist chicken on the inside with a golden, crispy skin. To make reverse seared chicken breast, preheat the oven to 325 degrees and prepare a rimmed baking sheet or rack that has been lightly coated with cooking spray. Meanwhile, prepare the chicken. If desired, you can add a few drops of lemon juice to the skillet before frying the chicken.
The process of cooking steaks by using indirect heat and time is called a reverse sear. The process works best for bone-in chicken and thick cuts of meat. It crisps the skin and browned the meat without charring. However, this method does not work for thin chicken breasts or vegetables that cook quickly. If you want to get the most out of the reverse sear chicken technique, practice makes perfect.
In general, chicken cooked this way produces a much juicier meat and is ideal for grilling. One of the disadvantages of reverse-searing is that it requires more time and flipping. Another disadvantage is that it produces almost no fond, which is a great base for pan sauces. This method is not for novice cooks. If you’re not sure about it, watch the video below and see if it suits your taste buds.
Before you start cooking, prepare your charcoal grill and fire up your chimney. Prepare the charcoal by ashing the chimney and laying wood chips on top of it. You can either use chunks of wood chips or smoke briquettes made by Kingsford. Wood chips do not need to be soaked; simply pour them on top of the coals. The wood chips will create a moderate smoke for about 15 minutes. Once the coals are sufficiently hot, move the chicken to a grate directly above them. After 30 minutes, the chicken will not be on high heat anymore.
In addition to the cooking method, reverse-searing can be used for other fried foods. The main challenge with reverse-searing is to cook food that has a crispy skin on the outside and moist inside. Double-fried chips and triple-fried chips both involve cooking at the same temperature but at a lower temperature. So, if you’re trying to cook a chicken dish that is moister on the inside, this method may work.
Preparation
Reverse searing chicken is a technique used to crisp the skin while keeping the meat moist. This technique is not ideal for steaks or other quick-cooking cuts of meat. Likewise, vegetables cooked over low or indirect heat don’t benefit from the technique. Meathead Goldwyn recommends treating the outside of the chicken separately from the inside. This ensures even cooking and redistribution of juices throughout the meat.
Although the technique of cooking meat has been around for a long time, the term still causes confusion. To help with the confusion, here are some tips for preparation. For starters, use a meat thermometer. This tool is almost essential when you are cooking chicken breasts. If you plan to cook more than one piece of meat, buy an instant-read thermometer. This tool also lets you adjust the cooking temperature of more than one piece of meat at a time.
If you have a sous vide machine, you can use this method to cook chicken breasts in the oven or on a grill. To reverse sear chicken, you can either use the machine or a cast-iron skillet. Alternatively, you can place the chicken breasts on a hot grill over the coolest part. A thick chicken breast can be butterflyed by slicing it horizontally and flattening it with a meat mallet.
To get the most out of reverse searing, it is best to select a thick cut of chicken. This type of cooking produces a more even interior temperature than other methods. In addition, it results in a caramelized crust on the outside. As with any other method, practice makes perfect, but reverse searing should be tried and tested before you commit to it. You will be glad you did. This technique has the potential to elevate chicken breasts to a new level.
Target internal temperature
The target internal temperature when cooking chicken is 165 degrees F. This is an important temperature to aim for, as undercooked chicken is not safe to eat. The chart below outlines the recommended temperature range for different cuts of chicken. The USDA recommends cooking chicken breasts and wings at 165 degrees F, but some poultry agencies recommend higher temperatures. As with any meat, experience will improve your ability to determine the ideal cooking temperature for your chicken.
Ideally, the juices will run clear, and the meat should feel firm to the touch. A food thermometer is an essential tool in determining whether your chicken is properly cooked. Don’t rely on color – undercooked poultry is likely to be contaminated and cause illness. In such a case, you should return the meat to the restaurant kitchen for further cooking. Keep any leftover cooked chicken refrigerated for two hours.
When it comes to cooking chicken, the target internal temperature for a chicken with one percent fat is 165 degrees Fahrenheit. When it comes to other cuts, you should aim for a temperature of 155 to 157 degrees F. Then, you can remove the chicken from the oven and transfer it to a heated frying pan. Make sure to monitor the temperature for at least 15 minutes. While it’s important to watch the temperature closely, you’ll be less likely to accidentally overcook your chicken.
While it’s tempting to rely on the thermometer, the truth is that the actual temperature of your chicken will fluctuate slightly during the resting period. When you do decide to roast a chicken, remember to check the temperature of the chicken’s center first. This will give you an idea of how much time it needs to cook. If you’re concerned about undercooked chicken, remember that the heat from the exterior is radiating into the core.
To prevent foodborne illnesses, ensure your chicken is cooked to the right temperature. The USDA recommends 165 degrees F for chicken and poultry. However, this temperature is conservative and higher than what tastes best. For this reason, the recommended temperature is generally too high. While many chefs recommend cooking chicken to 165 degrees F, most people agree that chicken tastes best at 150 to 155 degrees F. Cooking chicken to this temperature for a few minutes is perfectly safe.
Techniques
Reverse searing chicken can be done on almost any cut of meat, including breasts. About half of these recipes are prepared in the kitchen while the other half is prepared on a grill. Both approaches begin with indirect heat and finish with direct heat. Here are some tips for preparing chicken breasts:
The first step is to prepare the ingredients. This step can take a little time. If you have a large cast-iron skillet, you can use it to cook the chicken breasts. If you’ve never used a cast-iron skillet, you can use it. Then, put the chicken breast in the oven. Then, turn the heat down and sear the outer part of the chicken breast on the stovetop. This will give the chicken breasts a beautifully caramelized crust and flavorful meat.
After you’ve prepared the chicken breasts, prepare them for the reverse sear. The process produces a crispy crust and a juicy center. This method works for any meat, not just chicken. Sous vide is a great first step in the reverse sear process. It excels at precise, internal cooking, but can’t produce the crisp-seared finish of a traditional searing. It’s also the most cost-effective way to prepare chicken breasts.
Before cooking, be sure to use Kosher salt, which dissolves easily in liquid. Let the brine cool before adding the chicken. The chicken should be at room temperature before cooking, in order to cook evenly. This will also prevent tough spots from forming on the chicken. Once cooked, leave the chicken to rest before slicing and serving it. This resting time will help keep the juices inside the meat.
When cooking a chicken breast, make sure it reaches an internal temperature of 165 degrees Fahrenheit or 74 degrees. The internal temperature of chicken breasts varies from cut to cut. Use a meat thermometer to check the internal temperature. If you’re using a meat thermometer, you can use it to ensure your chicken breasts are done before you take them off the heat. Typically, chicken breasts are done when the fat renders and the skin turns golden brown.
How to Reverse Sear Chicken On A Grill Step By Step
Reverse-searing chicken on a grill is a technique that involves slow-cooking the chicken first and then finishing it with a high-heat sear to achieve a perfectly cooked and juicy interior with a crispy exterior. Here’s how to reverse-sear chicken on a grill:
Ingredients:
- Bone-in, skin-on chicken pieces (e.g., chicken breasts, thighs, or drumsticks)
- Olive oil
- Salt and pepper
- Optional: your choice of dry rub or marinade
Equipment:
- Charcoal or gas grill
- Meat thermometer
Instructions:
1. Preheat the Grill:
- Preheat your grill to a two-zone fire. For a charcoal grill, arrange the charcoal on one side of the grill, leaving the other side without coals. For a gas grill, turn on one side of the burners and leave the other side off.
2. Season the Chicken:
- Pat the chicken pieces dry with paper towels, which will help achieve a crispy skin. If desired, rub the chicken with a bit of olive oil to prevent sticking and help the seasoning adhere.
- Season the chicken pieces generously with salt and pepper. You can also use your favorite dry rub or marinade if you prefer.
3. Slow Cook the Chicken:
- Place the chicken pieces on the cooler side of the grill, away from the direct heat. The goal is to slow-cook the chicken by indirect grilling.
- Close the grill lid and let the chicken cook at a lower temperature (around 225-250°F or 107-121°C). Use the grill’s vents to control the airflow and maintain the temperature.
4. Monitor the Temperature:
- Use a meat thermometer to keep an eye on the internal temperature of the chicken. For chicken, you want to reach an internal temperature of about 160-165°F (71-74°C) in the thickest part of the meat. This may take 30-45 minutes, depending on the size of the chicken pieces.
5. Prepare for Searing:
- Once the chicken is within 10-15°F (5-8°C) of your target temperature, preheat the other side of the grill to high heat. If using a charcoal grill, add more coals and spread them evenly. For a gas grill, turn on all burners.
6. Sear the Chicken:
- Transfer the partially cooked chicken pieces to the hot side of the grill. Sear them for about 1-2 minutes per side or until they develop a crispy, golden-brown skin. Keep a close eye on them to prevent burning.
7. Rest and Serve:
- Remove the seared chicken from the grill and let it rest for about 5-10 minutes. Resting allows the juices to redistribute, resulting in a more tender and flavorful chicken.
- Slice, serve, and enjoy your perfectly cooked reverse-seared chicken!
The reverse-sear method results in chicken that’s both juicy and flavorful, with a crispy skin and beautifully seared exterior. It’s a great way to ensure that your chicken is cooked through while maintaining its moisture and flavor.
Read more great BBQ articles at Bob’s BBQ Secrets