How to Make Amazing Ribs Sous Vide
If you want to cook amazing ribs sous vide, then you’ll need to know some key facts. You can make ribs sous vide in a few different ways, so you’ll need to find out which method works best for you. There are two main methods to choose from, and they both come with some great advantages.
Subs-vide-then-smoke method vs traditional smoked ribs
When it comes to smoking meat, there are many variables and techniques. A good professional rib cutter should be able to tell when the ribs are ready. But if you want to try to duplicate the perfect ribs at home, you may have to do a bit of trial and error.
Some smokers like to cook their meat in a water bath for several hours before placing it in the smoker. This creates a smoky flavor and seals in the juices. Others like to spritz their ribs with a 50/50 vinegar and water mixture before cooking them. Both are good for a quick smoke.
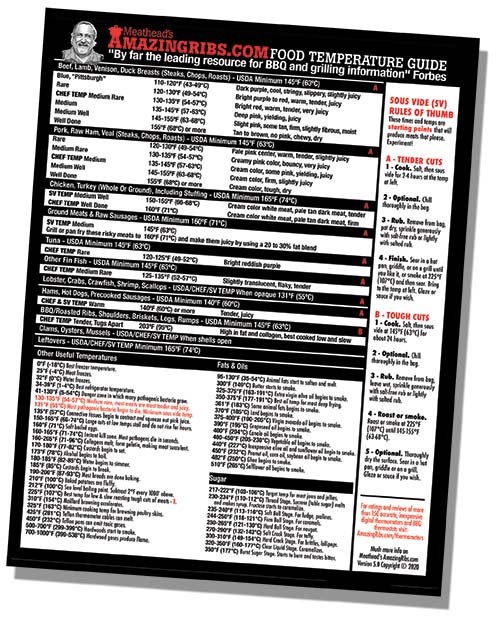
Sous vide is another technique for smoking meat. It is very simple to do and gives the meat a perfect texture. The temperature ranges from 131 to 195 degF. The key is to keep the core temperature of the meat down so the fat can melt faster.
One of the benefits of using the sous-vide method is that the meat can be cooked several days before putting it in the smoker. Another advantage is that the temperature range is clearly defined. However, the ribs don’t taste the same as those smoked in the traditional method.
You can use a metal bowl or a drip tray to hold the ingredients. Or you can put the water pan on the top of the heat source. If you choose to do both, you can set the temperature of the water pan to a different temperature for each time.
You’ll need a lid to put on the smoker to prevent excess evaporation. You’ll also need wood chips to place on the bottom of the grill. Wood chips can be soaked in liquid smoke before smoking to add extra flavor.
After the ribs have sat in the smoker for two hours, they are ready to be brushed with barbeque sauce. They should be a tad tender, but not mushy. Leaving them for an additional 15 minutes or so will help them bounce. Brushing them with the right bbq sauce will ensure that the sauce is evenly distributed on the meat.
Once you’ve finished smoking the meat, you can brush them with a sweet and zesty bbq sauce. The sauce can be made while the ribs are in the smoker. In fact, it’s usually better to smoke the meat before adding the sauce, so the meat is full of flavor.
Compared to the traditional smoked method, the sous-vide method is a little easier to understand and execute. It requires a lot less time, and you can do it in your own kitchen. Even if you don’t have a smoker, you can use the sous-vide method to get great-tasting ribs.
It takes a little more work, but the resulting ribs are sure to please any barbecue enthusiast. Whether you’re looking for something special for a picnic, a tailgate party, or just some fun on a cold night, sous-vide ribs can be the ticket.
Subs-vide-que pork belly is a crowd favorite
If you’re looking for some delicious pork belly, sous vide is the way to go. This method of cooking is easy, safe, and convenient. You simply place the food inside a plastic bag, add water to a container, and cook it at a low temperature for a long time. It’s a great way to get a juicier, more tender pork.
To make the sous vide method work, you need to have a large, sturdy container and an immersion circulator. Whether you’re using a plastic bag or a jar, make sure the contents are completely airtight. Then, place it in a pan, a large Dutch oven, or a pot that can hold a lid.
Once the dish has reached the desired temperature, it’s ready to come out. A sous vide dish can be repacked and stored in the refrigerator until you are ready to serve it. That makes it a perfect solution for entertaining guests. Alternatively, you can freeze the dish for up to four days.
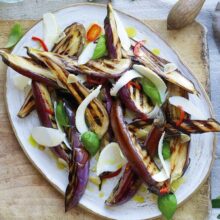
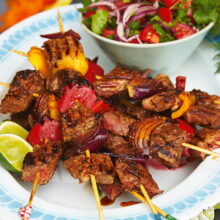
Sous vide ribs are an excellent choice for any barbecue party. These fat, juicy links of peppery sausage are coated with a sweet glaze. They’re so smoky that they cling to the bone as you bite into them. Served with a simple salad, they’re a nice complement to your other meats.
Another option is to simply sear the belly on the stove or in the grill. However, the best way to sear it is in a pan or with a searing torch.
The first step is to salt the belly. This helps to remove the moisture that accumulates in the fat. In addition, salting the meat ensures that it will easily pull from the bone.
Next, you can use a variety of seasonings to create a rub for the meat. For example, Marcus Wareing uses sesame, honey, and soy in his rub. Garlic and onion are also good additions. Depending on your taste preferences, you can also add a variety of herbs, including marjoram and thyme.
Searing is one of the most important steps in the sous vide process. A high-quality sear is necessary to get your pork to the perfect level of doneness. Ideally, you should use a pan or a stovetop, but a pan in a microwave is also a great way to achieve a high-quality sear.
After the meat has reached the desired temperature, you can move it to a frying pan. As it cooks, you can flip it over to sear it on all sides. When it’s finished, the meat will be well-browned, but not burnt.
When it comes to the sauce, you can opt for something simple like apple cider vinegar or brown sugar. Regardless of your preference, the sauce is a nice accompaniment to the pork.
Storage of sous vide ribs
Sous vide ribs are one of the most tender and smoky ribs you can make. They are juicy and fall off the bone. You can prepare them a few days in advance and store them in your fridge or freezer for a few hours before grilling. The process is pretty straightforward.
Before cooking, you’ll want to prep the ribs. Use a sharp pair of scissors to cut them into sections. Pat the ribs dry and then rub them with a spice rub. This can include granulated sugar or dark brown sugar for extra flavor. It’s also a good idea to add apple cider vinegar to the mix. Apple cider vinegar helps to tenderize the meat.
After the ribs are cooked, you can either leave them in the fridge or freezer for up to three months, or you can heat them up. If you don’t want to do the heat cooking yourself, you can use a sous vide freezer bag. A vacuum sealer is your best option for storing the ribs.
In addition to the usual storage methods, you can also use a foil pan to store the ribs. These ribs will have a caramelized outer layer that adds flavor and texture. Alternatively, you can wrap the ribs in foil and place them in the refrigerator. This method is great if you plan to cook them in the oven or on the grill. However, the smoky taste will be lost.
To store your ribs, you can also use a plastic tub. Unfortunately, plastic tubs lose their seals and can become frosty. For better results, you can use a plastic zipper bag and then seal the top to keep the air out.
If you plan on freezing your ribs, you should also prepare them in advance. This will help the freezing process go faster. When preparing your ribs, make sure to pre-cool the meat in water before placing it in the freezer. Also, you should keep the ribs in one layer and not overfill the container. Once the meat has cooled to below 40 degF, remove the ribs and store them in the freezer.
The easiest way to freeze ribs is to use a vacuum packer. If you don’t have a vacuum packer, you can still try this method. Just make sure to place your ribs in a sealed ziplock bag before placing them in the water bath.
Another method of preserving ribs is to wrap them in aluminum foil. The foil can be wrapped around the ribs, or it can be filled with beef broth or another flavoring. Place the foil on a baking sheet and bake until it reaches 165°F inside.
While you may think that reheating your ribs is the best way to preserve them, the truth is that the process can take up to an hour. That’s a long time to wait for your ribs to thaw and you can end up with poor quality ribs.

Did you miss our previous article…
https://notoriousbob.net/?p=2525